(Via: iphonehackiosdev)
Apple has released at the WWDC the iOS 6 beta 1 (build 10A5313k) for devellopers.
iPhone 4 S - Direct Link: iPhone4,1_6.0_10A5316k_Restore.ipsw
iPhone 4 GSM - Direct Link: iPhone3,1_6.0_10A5316k_Restore.ipsw
iPhone 4 CDMA - Direct Link: iPhone3,3_6.0_10A5316k_Restore.ipsw
iPhone 3GS - Direct Link: iPhone2,1_6.0_10A5316k_Restore.ipsw
iPad 3 Wi-Fi - Direct Link: iPad3,1_6.0_10A5316k_Restore.ipsw
iPad 3 Wi-Fi CDMA - Direct Link: iPad3,2_6.0_10A5316k_Restore.ipsw
iPad 3 Wi-Fi Global - Direct Link: iPad3,3_6.0_10A5316k_Restore.ipsw
iPad 2 Wi-fi - Direct Link: iPad2,1_6.0_10A5316k_Restore.ipsw
iPad 2 Wi-Fi + 3G - Direct Link: iPad2,2_6.0_10A5316k_Restore.ipsw
iPad 2 Wi-Fi + 3G CDMA - Direct Link: iPad2,3_6.0_10A5316k_Restore.ipsw
iPad 2 Wi-Fi (Rev A) - Direct Link: iPad2,4_6.0_10A5316k_Restore.ipsw
iPod touch 4th G - Direct Link: iPod4,1_6.0_10A5316k_Restore.ipsw
Torrent direct links:
iPhone 4S : download the torrent
iPhone 4GSM : download the torrent
iPhone 4 CDMA : download the torrent
iPhone 3GS : download the torrent
iPod touch 4th G : download the torrent
Tampilkan postingan dengan label Jailbreak. Tampilkan semua postingan
Tampilkan postingan dengan label Jailbreak. Tampilkan semua postingan
Jumat, 15 Juni 2012
iOS 6 beta 1 Firmware Direct Download Links


Rabu, 06 Juni 2012
WWDC 2012 and the surprises Apple will announce jailbreak is on !!!
 WWDC 2012 and the surprises Apple will announce jailbreak is on !!!
With only a week to go before WWDC 2012 and the surprises Apple will announce there, today seems like a good time to release updates to our suite of free software to include the rocky-racoon jailbreak and untether developed by @pod2g and @planetbeing!
Today’s updates are:
- PwnageTool 5.1.1
- redsn0w 0.9.12b1
- cinject 0.5.4 (version 0.5.3 also had rocky-racoon but this includes some updates)
- ultrasn0w 1.2.7 (5.1.1 compatibility only - no new baseband support)
If you’ve already installed rocky-racoon, don’t bother reinstalling it unless you’ve had problems and would like to try a different tool. The underlying untethered jailbreak (rocky-racoon) is identical to what is already installed by last week’s tools like Absinthe, cinject-0.5.3, and the rocky-racoon Cydia package — only the injection method offered by the above tools differs.
redsn0w allows owners of A4+earlier devices to install rocky-racoon two different ways:
- backup/restore method similar to Absinthe and cinject
- its traditional limera1n-based ramdisk install. If you have a lot of media on your A4 device (music, movies, TV shows, etc), then the ramdisk method is preferrred because it avoids any possibility of later problems related to syncing to iCloud (including Photo Stream and Music Match). The ramdisk method is not available for A5 devices or later because limera1n can’t be used. If you’d like to use redsn0w’s ramdisk method, just be sure to put the A4 device in DFU or Recovery mode before starting redsn0w (otherwise it will immediately start to use the backup/restore method).
We’ve also added a new redsn0w feature specifically for those who got in on the SAM unlock: you can now include your SAM tickets as part of your initial ramdisk jailbreak of iPhone4 or earlier, or alternatively you can upload your SAM tickets to any device after its been jailbroken. redsn0w accepts either the individual SAM activation ticket plist file, or the entire zip file created by redsn0w’s “Backup” button. As usual, redsn0w continues to cover all of its previous jailbreaks and untethers (so redsn0w-0.9.12b1 covers everything from 5.1.1 all the way back to 4.1).
PwnageTool also avoids any possible sync issues, but again it applies only to A4+earlier devices.
If you unlock your iPhone with ultrasn0w or a commercial method, you must use PwnageTool to avoid updating your baseband otherwise you’ll lose the unlock. PwnageTool will also jailbreak+untether the AppleTV2,1 5.0_2B206f (unless you customize the IPSW further, you’ll have just basic SSH access to the device).
If you’d like to contribute to those that actually developed rocky-racoon, please visit here (any other links you may see are not going to the actual rocky-racoon developers, they’re being diverted to other “related” or fraudulent accounts).
This particular jailbreak brought an unusual amount of fanfare and hoopla to the table, including “press releases” and other haughty silliness.
We’d just like to take this opportunity to remind everyone that jailbreaking is about freedom, not fame and donations!
Here are the download links. Please use our comment section below to give feedback. Enjoy!
- PwnageTool 5.1.1 (OS X)
- redsn0w 0.9.12b1 (OS X)
- redsn0w 0.9.12b1 (Windows — run in Administrator Mode)
- cinject 0.5.4 (OS X + Windows)
- ultrasn0w 1.2.7 — install this via Cydia
Rabu, 30 Mei 2012
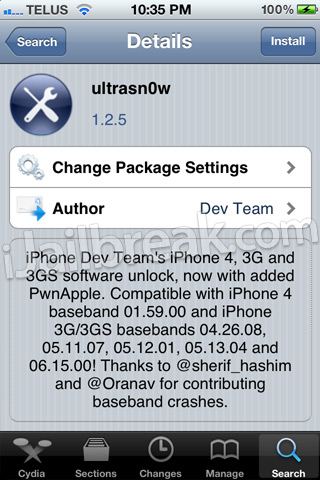
Unlock iPhone UltraSn0w Fixer for 5.1.1
Step 1: The first thing you will need to do is Jailbreak your iPhone on the iOS 5.1.1 firmware by visiting iJailbreak’s How To Jailbreak Section.
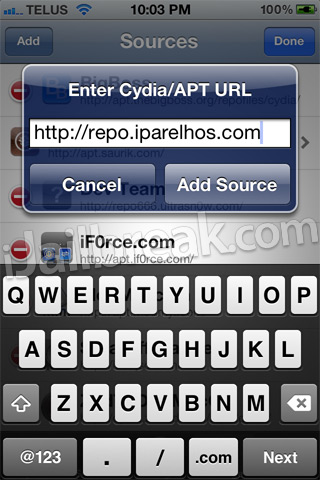
Step 2: Now you will need to launch Cydia so we can add the 3rd party repository UltraSn0w Fixer for 5.1.1 is hosted in. When Cydia is up and running go into the Manage tab, Sources section, tap the edit button and then the add button and add the following source:
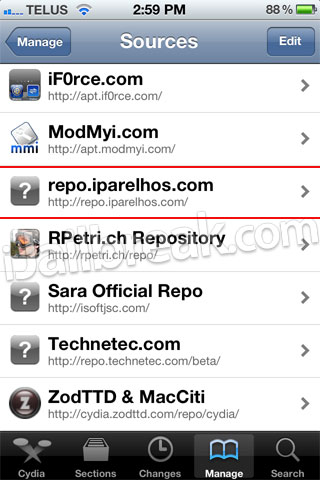
Step 3: With the source successfully added you will need to simply go into the iParelHos repo section.
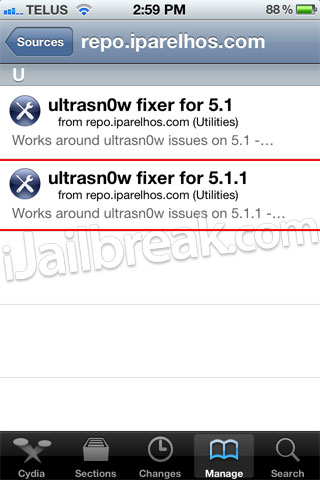
Once you see UltraSn0w Fixer for 5.1.1 simply install it to your iPhone.
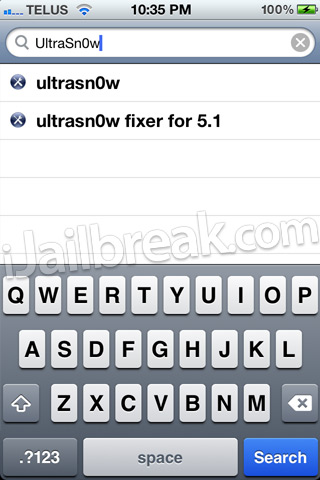
Step 4: When UltraSn0w Fixer has been installed simply go into Cydia’s Search tab and search for UltraSn0w.
After you have searched for it and see it, install it to your iPhone also and reboot.
Congratulations! You have just unlocked your iPhone 4 or iPhone 3GS running the iOS 5.1.1 firmware with UltraSn0w Fixer for 5.1.1. If you are still having troubles make sure you installed UltraSn0w Fixer for 5.1.1 before UltraSn0w. For those that did it in the reverse order you will need to uninstall both packages, reboot your iPhone and follow this how to guide once again. Please leave any further questions or thoughts in the comments section below…
http://www.guarforum.net/gsmreport/s...d.php?t=139777
Absinthe 2.0.4 Released
Absinthe 2.0.4 Released
Absinthe: V2.0.4
CHANGES
iPad 1, iPad 2, iPad 3 (iPad2,4 is now supported as of Absinthe 2.0.4)
iPhone 3GS, iPhone 4, iPhone 4S
iPod touch 3rd generation, iPod touch 4th generationHow To Use Absinthe 2.0
1. Make a backup of your device in iTunes by right clicking on your device name under the ‘Devices’ menu and click ‘Back Up’.
2. Once your backup is complete return to your device and go to Settings – General – Reset – Erase all Content and Settings. This will make the jailbreak process much faster.
3. Open Absinthe and be sure you are still connected via USB cable to your computer.
4. Click ‘Jailbreak’ and wait…. just be patient and do not disconnect your device.
5. Once jailbroken return to iTunes and restore your backup from earlier. Right click on your device name under the ‘Devices’ menu in the left panel of iTunes and click ‘Restore from Back Up…’ then select the latest backup you created before. (restoring this backup will return all the content previously on your device ie, apps, photos, etc.)
6. Thanks for using Absinthe, enjoy your jailbroken iDevice!

Senin, 28 Mei 2012
Absinthe 2.0.2 is released to Jailbreak iPhone 4 firmware (9B208)
Absinthe v2.0.2
Absinthe jailbreaking tool has been updated by Chronic Dev team to v 2.0.2 to support the new firmware version of iOS 5.1.1 (Build 9B208) for iPhone 4 GSM.
Here’s what the Chronic Dev team tweeted:tSupport for the new iPhone4 firmware (9B208) is on the way, should be live within a couple of hours#Absinthe
#Absinthe 2.0.2 is now live! Includes support for new iPhone4 firmware 9B208
Supported Devices with Absinthe 2.0.2:
- iPad 1, iPad 2, iPad 3
- iPhone 3GS, iPhone 4, iPhone 4S
- iPod Touch 3G, iPod Touch 4G
Download Links:


Sabtu, 26 Mei 2012
Jailbreak 5.1.1 Untethered with Absinthe 2.0.1 & fix Absinthe Lockdown Error

The main errors that pop up seem to be “Error detecting device (lockdown error -5)” and “Could not connect to lockdown“…
We’ve been in contact with @pod2g and @pimskeks, and they confirmed the problem is a random coincidence that creates a timeout. But the fix is fairly easy. All you have to do is go to Settings > General > Reset > Reset All Content and Settings. Then make sure you download Absinthe 2.0.1 and run it again.
Absinthe 5.1.1 Untethered Jailbreak - Supported Devices:
- iPhone 3Gs
- iPhone 4
- iPhone 4 CDMA
- iPhone 4S
- iPad 1
- iPad 2 Wifi
- iPad 2 GSM
- iPad 2 CDMA
- iPad 2 Wifi, R2
- iPad 3 Wifi
- iPad 3 Global
- iPad 3 CDMA
- iPod 3G
- iPod 4G
- AppleTV 2
Sabtu, 19 Mei 2012
Jailbreak Your iPhone 4 Using RedSn0w 4/3gs (Windows) [5.1.1]
These are instructions on how to jailbreak your iPhone 4 on the 5.1.1 firmware using RedSn0w for Windows.
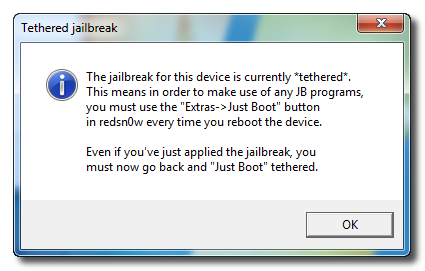
Upgrading your iPhone to iOS 5.1.1 through iTunes will update your baseband, potential removing or ruining your chances for an unlock. Please follow this tutorial on how to update to iOS 5.1.1 using a custom ipsw if you need an unlock. The jailbreak is also tethered which means you will need to connect your device to the computer each time you reboot. Finally, it may be prudent to save your SHSH Blobs by following this tutorial before continuing.
If you want to jailbreak a lower firmware version you can find the appropriate tutorial here. If you are on iOS 5.1 and want to stay on that firmware you can still use these instructions by performing the same steps with the iOS 5.1 firmware.
Step One
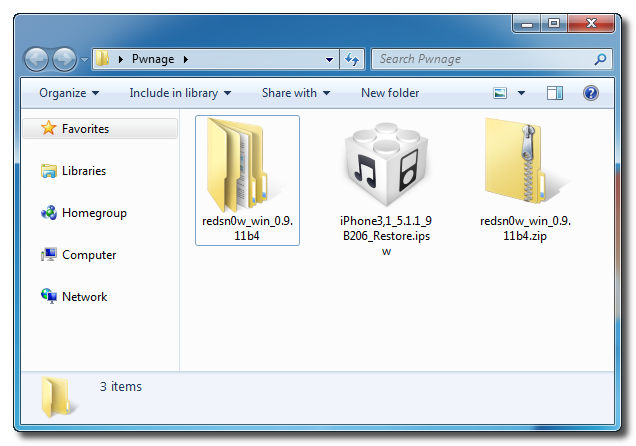
Create a folder on your desktop called Pwnage
Download the latest version of RedSn0w from here and place it in the Pwnage folder. Likewise, download the 5.1.1 firmware from here and place it in the Pwnage folder. (Note: you do not need to download the 5.1.1 firmware if you are already on iOS 5.1.1)
Extract the RedSn0w zip file by double clicking it.
Step Two: (You can skip this step if iOS 5.1.1 is already installed on your device)
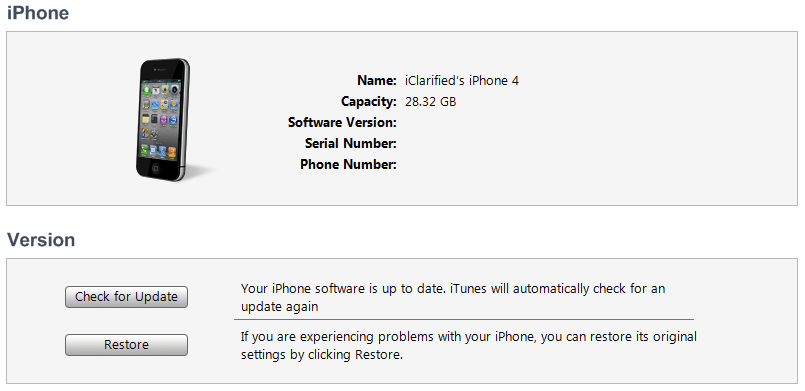
Connect your iPhone to the computer and launch iTunes.
Select your iPhone from the list of devices on the left. Now hold down Shift and click the Restore button. Restore is preferred as it won't create any wasted space on your iPhone.
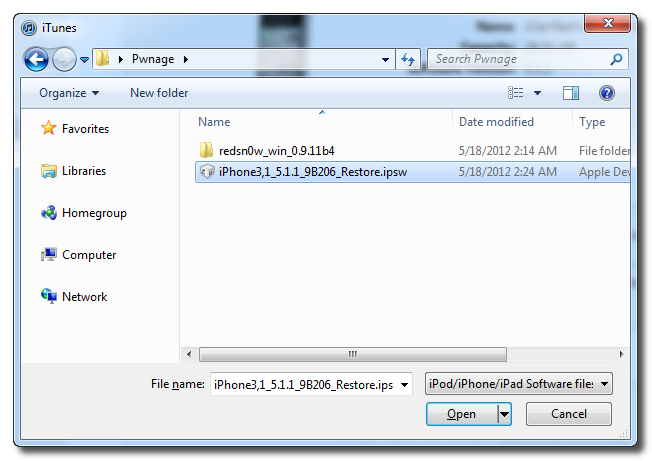
Navigate to the Pwnage folder on your desktop and select the 5.1.1 firmware ipsw. Click the Choose button to continue.
iTunes will now update your iPhone to the new firmware.
Step Three
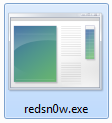
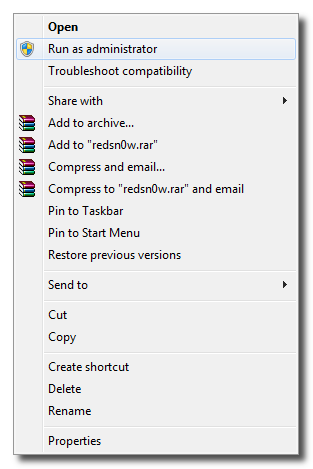
Launch the redsn0w application from the redsn0w folder we extracted earlier. You can do this by right clicking the executable and selecting Run as Administrator contextual menu.
Step Four
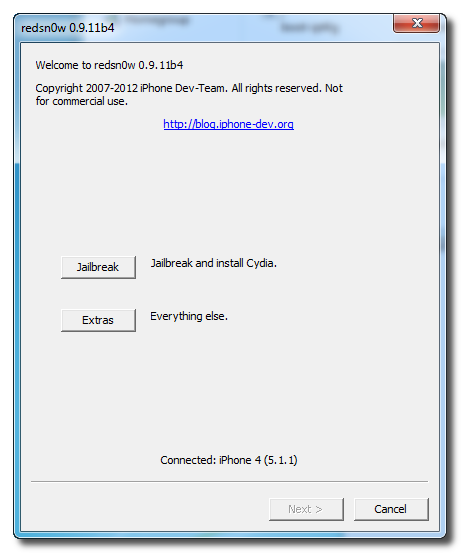
Once RedSn0w opens click the Jailbreak button
Step Five
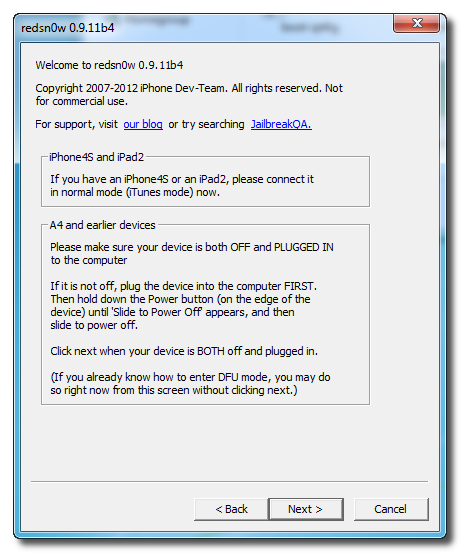
Plug your iPhone into the computer and make sure its OFF then click the Next button
Step Six
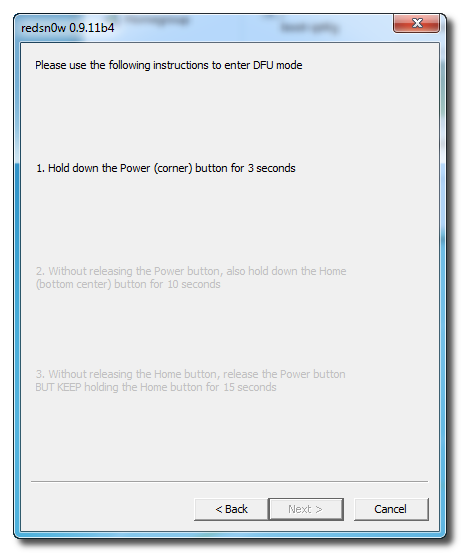
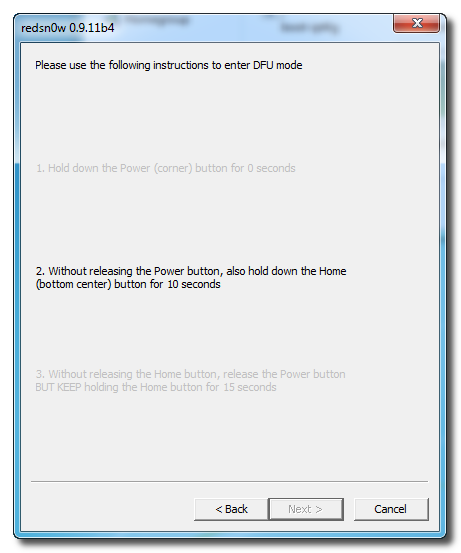
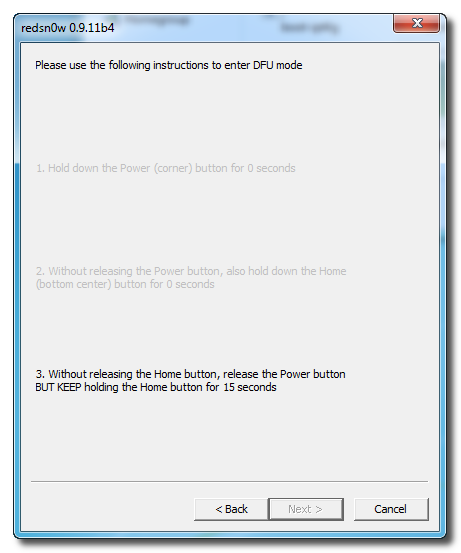
RedSn0w will now guide you through the steps to get into DFU mode.
Hold down both the Home button and the Power button for 10 seconds.
Release the Power button and continue holding the Home button until RedSn0w detects the device.
Step Seven
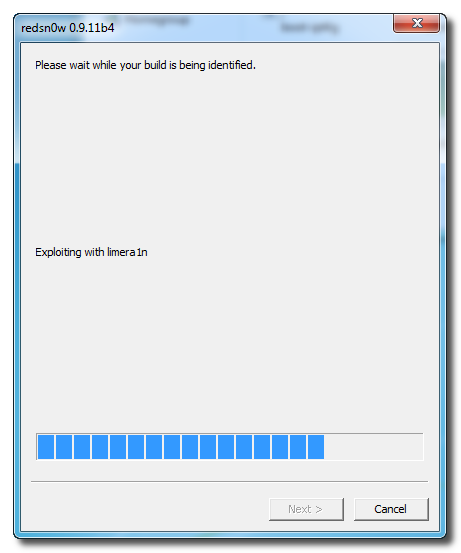
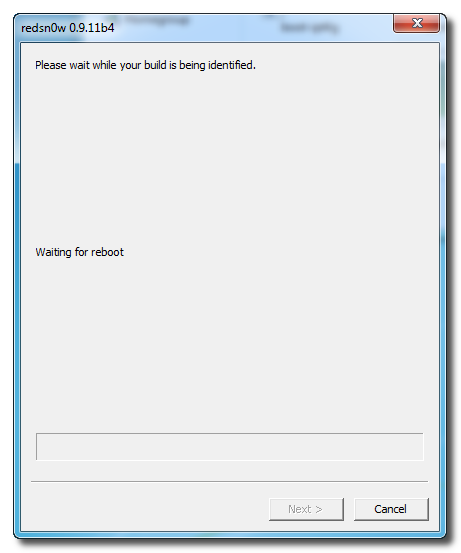
Your iPhone will now be exploited with limera1n and reboot
Step Eight
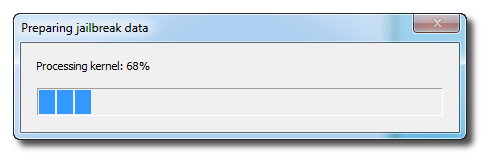
RedSn0w will now prepare the jailbreak data.
Step Nine
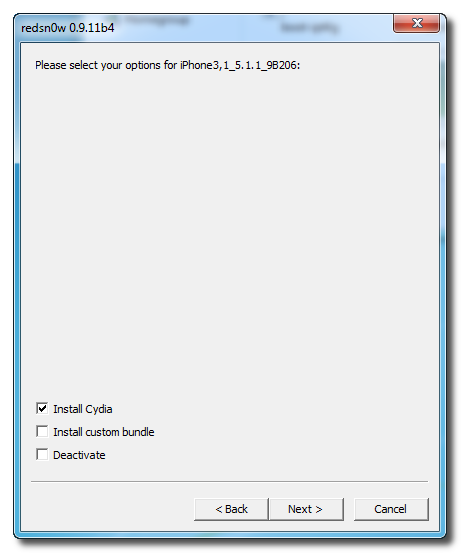
Select Cydia from the list of options and click Next.
Step Ten
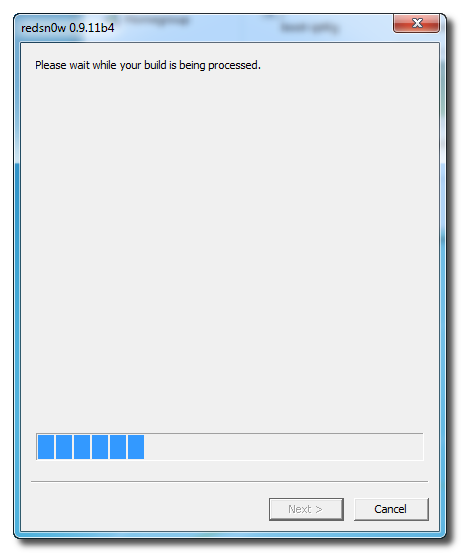
Your iPhone will now be rebooted again and RedSn0w will begin uploading the new RAM Disk and Kernel.
Step Eleven
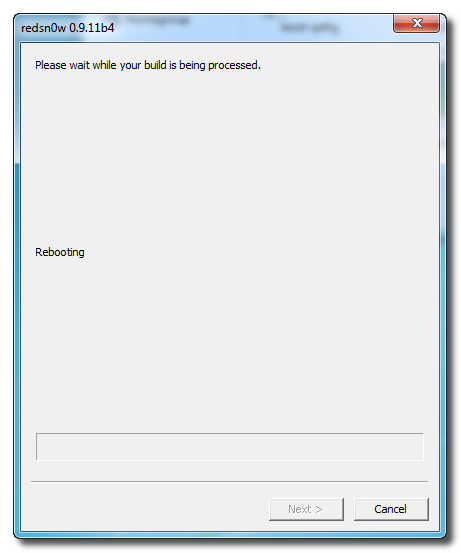
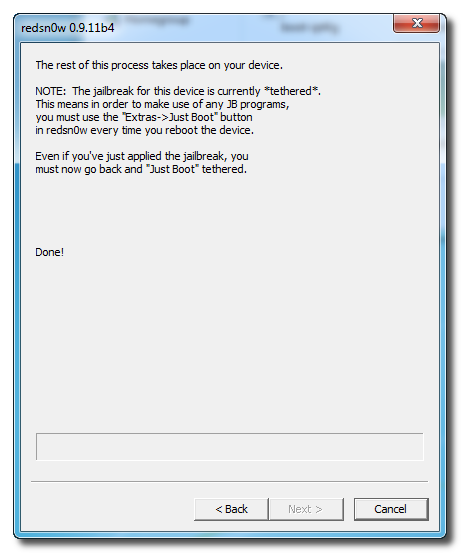
Once this is complete you will be notified that RedSn0w is done. When your iPhone finishes rebooting (5 minutes or so) it will be jailbroken with Cydia on the SpringBoard.
BOOT TETHERED
Once you have jailbroken you will need to rerun redsn0w to boot tethered.
Step One
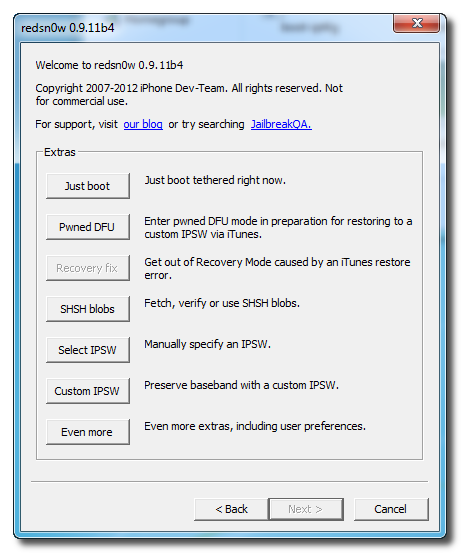
From the main RedSn0w menu click the Extras button.
Step Two
Select Just boot from the Extras menu to just boot tethered.
*As usual a big thanks to the iPhone Dev-Team and Geohot for their hard work and contribution to the iPhone community.
All software here http://www.gfhost.net/iphone/index.htm

Selasa, 15 Mei 2012
Save your Shsh/blobs for 5.1.1 via cydia
As we all know ios 5.1.1 has been rolled out and the new tinyumbrella allows shsh to be saved for 5.1 and 5.1.1 for the iphone 4 and 4s. That is possible until Apple servers keep on signing 5.1.
So if you have a jailbroken phone then simply add the latest I S H S H I T
- I have added screenshots for you.
save shsh first then ask questions.
- You can save a backup copy by email to yourself.
- All previous versions can also be saved when you select via cydia.
- Make Sure you open app after install and then select all versions and then deselect via cydia.
Good luck! the smart ones will do as told and take benefit.
iSHSHit Downloads Your SHSH Blobs Directly to Your iDevice


ishshit_1.0.15.rar
http://www.mediafire.com/?3813qdxh3t4kb48

Iphone Carrier Checker (Direct with Apple) Free - By fr3nsis
This version have direct connection with apple site so no problem if 3rd party site is offline ...
http://www.mediafire.com/?ftxo7qlox2lbuv6
as usual net framework 2.0 is required

Sabtu, 12 Mei 2012
Downgrade your iPhone 4S, iPad 2, or new iPad with RedSn0w 0.9.11b1
It’s finally here folks, the official downgrade tool for A5 devices!
Starting with redsn0w version 0.9.11b1, those with newer devices (iPad2, iPad3, and iPhone4S) can join the downgrade fun too!
In a radical departure from previous versions of redsn0w, it now directly supports restoring IPSWs to your device. The first use of this new feature implements a hack that allows A5 downgrades without a bootrom-level exploit.
Indeed, you can now downgrade your iPhone 4S, iPad 2, or new iPad (iPad 3) with the latest version of RedSn0w 0.9.11b1. Downgrading will allow you to perform an untethered jailbreak on your iPhone 4S, or iPad 2 running iOS 5.0.1 firmware.
Check out our tutorial for the step-by-step downgrade instructions inside…

Note: You must have your SHSH blobs for iOS 5.0.1 either stored locally by means of TinyUmbrella, etc., or Cydia must have your 5.0.1 blobs for this downgrade to work successfully.
Step 1: Download the latest version of RedSn0w 0.9.11b1 RedSn0w 0.9.11 beta 1: Mac • Windows
Step 2: Download the latest firmware (5.1.1) for your device from our downloads page, along with the 5.0.1 firmware.
Step 3: Place your device into DFU mode.
Step 4: Run RedSn0w 0.9.11b1, and make sure RedSn0w detects your device in DFU mode. Navigate to Extras > Even more > Restore and click IPSW under the IPSW section. RedSn0w will then ask you for your iOS 5.0.1 IPSW. Once you locate iOS 5.0.1, RedSn0w will ask your for the latest firmware (iOS 5.1.1).Step 5: Once both firmwares have been validated, it’s time to locate your saved SHSH blobs. If you’ve jailbroken your device before, you should have those available on Cydia, and therefore you can use the Remote option. If you’ve never jailbroken your device before, but you saved your SHSH blobs with a tool like TinyUmbrella, then choose Local and browse your computer for your blobs. We’d recommend clicking the Remote option first.Step 6: Once your blobs have been verified, there is nothing left for you to do, just let RedSn0w execute the full process. First RedSn0w will install a hacked version of the latest firmware (iOS 5.1.1), and then it will downgrade your firmware to iOS 5.0.1.
Step 7: Upon downgrading successfully you will be presented with a success message. Now all you have to do is setup your device, and verify that you are now on iOS 5.0.1 via Settings > General > About on your device.What’s Next?
Most people will want to jailbreak their newly downgraded device. If you’re using an A5 device like the iPad 2, or iPhone 4S, you can now jailbreak using Corona-A5. You can do this directly from RedSn0w. We will have a tutorial that shows you how to jailbreak your A5 device using RedSn0w in the near future. Until then, you can always use a tool like Absinthe Absinthe v0.4: Mac - Windows - Linux to jailbreak as well.
Were you able to downgrade successfully? Have any tips or tricks? Please share them below!
Important: If you rely on a software unlock or SIM interposer for your iPhone, beware! This method will update your baseband, and you could permanently lose your unlock.


UPDATE
5x redux
What’s old is new again!
Jailbreakers with devices that pre-date the iPad2 will always be able to downgrade (with SHSH blobs) to previous firmware versions due to geohot’s limera1n exploit, which allows us to bypass the restrictions that Apple places on restores. But until now, that ability has been limited to those older devices (if you have an older device and don’t know how to do that, check the popular tutorial sites or ask in the comments below).
Starting with redsn0w version 0.9.11b1, those with newer devices (iPad2, iPad3, and iPhone4S) can join the downgrade fun too! In a radical departure from previous versions of redsn0w, it now directly supports restoring IPSWs to your device. The first use of this new feature implements a hack that allows A5 downgrades without a bootrom-level exploit.
Some important points:
- The new feature is at Extras->Even More->Restore
- You cannot downgrade without the personalized SHSH blobs for your device at that lower firmware. You need to have fetched those blobs while the signing window was open, using either Cydia’s built-in TSS@Home feature, or with TinyUmbrella. The new Restore screen of redsn0w lets you choose either the remote blobs or local ones (for the earlier firmware). If you don’t know where TinyUmbrella put your blobs, TinyUmbrella has a button that will show you (copy them out of that folder and feed them to redsn0w).
- The A5 downgrade method actually updates to the latest firmware before downgrading to the earlier one. This process updates your baseband to whatever is newest. DO NOT USE THIS METHOD IF YOU RELY ON UNOFFICIAL UNLOCKS of your iPhone4S. Those who used the temporary SAM technique to unlock their iPhones to specific SIMs shouldn’t be affected by this baseband update.
- This method can be fixed by Apple with a firmware update. It’s a (pleasant) mystery why they haven’t fixed it yet, because reverse-engineering of the restore ramdisk indicates they do know about it. It’s possibly too niche to bother to fix right now.
- The least-tested devices with this method are the iPad2,3 and iPad3,2 (because we don’t have those models). If you do and you feel like experimenting, please let us know how it turns out in the comment section below!
- This update involves a bunch of new redsn0w code. We recommend sticking to the previous version 0.9.10b8b unless you’re specifically using this new feature, until all the bugs are worked out! (Note: If redsn0w gets stuck at the “Waiting for device” stage for more than 30 seconds, you’ve hit a pesky GUI bug…that will be fixed in an upcoming version!)
Of course all eyes are on @pod2g for his upcoming 5.1 untethered jailbreak. Watch his blog or twitter feed for the latest updates about that, but in the meantime if you accidentally updated your jailbroken A5 device to something later than 5.0.1, feel free to try this new A5 firmware downgrade feature of redsn0w!
Update #1: We accidentally left out one of the two flavors (“9A406”) of 5.0.1 for iPhone4S. It’ll be in the next update, but in the meantime check if Cydia or TU saved your blobs for the other 5.0.1 for iPhone4S (“9A405”). Version 0.9.11b2 adds support for that second “9A406” flavor of 5.0.1 for the iPhone4S.
Update #2: Version 0.9.11b3 should fix the spurious “Restore failed” messages people were sometimes getting, and it behaves better with nearby devices that have wifi syncing enabled!
Update #3: Version 0.9.11b4 completes the tethered JB support for 5.1.1 on A4 devices and earlier, including proper “Stitching” and “Custom” creation of NO_BB IPSWs.
Here are the redns0w download links:
- redsn0w 0.9.11b4 for OS X
- redsn0w 0.9.11b4 for Windows (be sure to run in Administrator mode)
Selasa, 08 Mei 2012
Jailbreak 5.1.1 Semi Untethered iPhone 4, 3GS, iPad, iPod Touch
How to jailbreak 5.1.1 semi untethered? Just a while ago Apple released a new fresh version of iDevices operating system with bug fixes and improvements. iOS 5.1.1 for iPhone, iPod touch and iPad is now available for download. After trying the current version of Redsn0w we are confirming that Redsn0w 0.9.10 b8b can bring tethered jailbreak for non-A5 devices (iPhone 4, 3GS, iPad 1, iPod touch 4G and iPod touch 3G)
Requirements to jailbreak 5.1.1:
Required Downloads:
- Download Redsn0w 0.9.10 b8b for Windows
Download Redsn0w 0.9.10 b8b for Mac- Download iOS 5.1 Firmware IPSW for iPhone 4S, iPhone 4, iPhone 3GS:
Download iOS 5.1 Firmware IPSW for iPad 3, iPad 2, iPad 1:
Download iOS 5.1 Firmware IPSW for iPod Touch 4G, 3G:- iPod touch 3G
- iPod touch 4G

- Download iOS 5.1.1 ipsw firmware – iPhone 4S, 4, 3GS, iPad 3, 2, 1, iPod touch 4g, 3g – Direct Links
- iPhone 4S
- iPhone 4 (GSM)
- iPhone 4 (CDMA)
- iPhone 3GS
- iPad 3 WiFi
- iPad 3 GSM
- iPad 3 CDMA
- iPad 2 WiFi
- iPad 2 GSM
- iPad 2 CDMA
- iPad
- iPod touch 3G
- iPod touch 4G
- Download iTunes 10.6 for Windows / Mac
How to jailbreak 5.1.1 Semi-Untethered :
Step 1: Connect your iPhone / iPad / iPod touch with your PC via USB, and open iTunes then retire to iOS 5.1.1 if you did't already installed it on your iDevice.
Step 2: Open Redsn0w > Extras > Select IPSW and point to iOS 5.1 ipsw (not iOS 5.1.1)
Step 3: Once it identifies iOS 5.1 build, make sure you have select Cydia then click Next.
Step 4: Redsn0w will install Cydia on your device.
Tethered Jailbreak : Once current Redsn0w jailbreak is still tethered jailbreak, you will be required to connect your iOS device with your computer and run Redsn0w again then choose “Extras” > “Just boot”
How to Jailbreak 5.1 Semi Untethered - iPhone 4, 3GS, iPad 1, iPod touch 4G, 3G:
Step 1: Now, open Cydia > Manage > Sources.
step 2: Tap on Edit > Add and insert the following repository
Step 3: Search for SemiTether and install it then reboot your device.Step 4: Now congratulations, now you have protected your device and you will never stuck on Apple logo again


Sabtu, 28 April 2012
How to Restore Your iPhone Unlock Ticket [SAM]
These are instructions on how to restore your iPhone unlock ticket obtained using the SAM unlock method.
If you've unlocked with SAM but haven't backed up your unlock ticket, you should do so immediately by following this tutorial. To follow these instructions you will need to have the unlock ticket and iFile installed. You can get iFile from Cydia.
Step One
Insert your previously unlocked SIM card and make sure SAM is disabled in SAMPrefs.

Step Two
Email yourself the zip archive created when you backed up your unlock ticket. Open the email on your iPhone and tap to open the attachment. When prompted to select an application to open the attachment with choose iFile.


Step Three
When iFile opens it will ask you to choose between Zip Viewer and Unarchiver. Choose Unarchiver and tap the Done button when it's completed extracting.


Step Four
Tap the Edit button at the top right of the screen and select the Lockdown folder that was just extracted.


Step Five
Press the Clipboard button at the bottom right and choose Copy/Link from the popup menu. Then press the Done button at the top right of the screen.


Step Six
Use the back button at the top left of the screen to navigate to the /var/root/Library folder. Press the Edit button at the top right of the screen and select the Lockdown folder.


Step Seven
Tap the Trash icon at the bottom of the screen and choose Move File to Trash from the menu that appears.


Step Eight
Tap the Clipboard icon at the bottom right of the screen and choose Paste from the menu that appears.


Step Nine
Press the Done button at the top right of the screen then reboot your device.

Step Ten
Once your iPhone has been restarted it will pick up the network for the unlocked SIM card.

If you've unlocked with SAM but haven't backed up your unlock ticket, you should do so immediately by following this tutorial. To follow these instructions you will need to have the unlock ticket and iFile installed. You can get iFile from Cydia.
Step One
Insert your previously unlocked SIM card and make sure SAM is disabled in SAMPrefs.

Step Two
Email yourself the zip archive created when you backed up your unlock ticket. Open the email on your iPhone and tap to open the attachment. When prompted to select an application to open the attachment with choose iFile.


Step Three
When iFile opens it will ask you to choose between Zip Viewer and Unarchiver. Choose Unarchiver and tap the Done button when it's completed extracting.


Step Four
Tap the Edit button at the top right of the screen and select the Lockdown folder that was just extracted.


Step Five
Press the Clipboard button at the bottom right and choose Copy/Link from the popup menu. Then press the Done button at the top right of the screen.


Step Six
Use the back button at the top left of the screen to navigate to the /var/root/Library folder. Press the Edit button at the top right of the screen and select the Lockdown folder.


Step Seven
Tap the Trash icon at the bottom of the screen and choose Move File to Trash from the menu that appears.


Step Eight
Tap the Clipboard icon at the bottom right of the screen and choose Paste from the menu that appears.


Step Nine
Press the Done button at the top right of the screen then reboot your device.

Step Ten
Once your iPhone has been restarted it will pick up the network for the unlocked SIM card.

Langganan:
Postingan (Atom)